People often tell me: “Isn’t it a lot of work to do your hair in the morning? I would take me foreeeever!” Funnily enough, they are not talking about hair care or anything like that. They really think that hairstyles for long hair must be super complicated and take forever!
I say: the easiest hairstyles in the world are hairstyles for long hair! Especially if you have curly hair like me!
When my hair was shorter, I needed to use a lot of product in it. I also needed to spend quite some time to make it presentable.
Now? Give me a pencil and 30 seconds and I have a hairdo that could pass off as a corporate hairdo! Okay, for corporate I might have to use an actual hair stick instead of a pencil, but you get the idea.
Related: 7 cute summer hairstyles for long hair
Related: 9 things people with long hair don’t want to be told anymore
Disclosure: Some of the links below are so-called provision links, meaning, at no additional cost to you, I can earn a commission if you click through and make a purchase.
Let me show you my easy hairstyles for long hair!
So to prove my point and show how easy it can be to style your long hair, let me show you 10 quick and easy hairstyles for long hair. You can do all of them yourself, no assistance needed!
We will look at the classics first and then I’ll show you my go-to long hair updos that can be done in a few seconds. Yes, with step by step instructions. Let’s dive in!
1. The easiest hairstyle there is: Let it flow!

Okay, this one needs to have the honorable mention. If you have long hair, you can simply wear your hair loose. Long, flowing hair always looks good! Unless you have a bad hair day, of course.
This is also the only hairstyle that doesn’t need any explanation, so I won’t dwell on it too much. Just remember, you have beautiful hair! Enjoy the fact that it’s also an accessory!
Related: How long is too long for hair? Here’s how to decide!
2. The good old ponytail
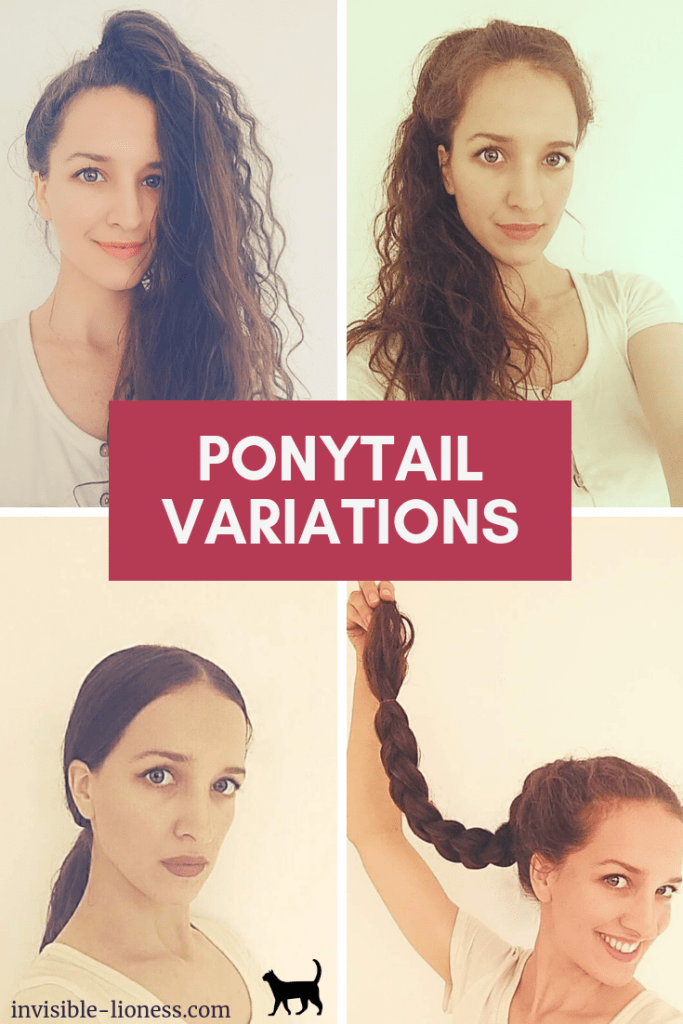
The plain old ponytail is a classic and can look very different, depending on the position. And it’s a perfect look for second-day hair, when the roots don’t have all the volume and definition anymore.
For a bubbly look, make a messy ponytail directly on top of your head. Or go for the popular high ponytail.
If you want it to look more elegant, a low ponytail at the nape of your neck is more fitting. You know, for those special occasions or special events when you want to be a little more chic.)
Play around with sleeking your hair back for a fancy look. Or pull out some strands to achieve a more romantic vibe.
You can even wear a braided ponytail to switch things up.
Remember, the simple hairstyles for long hair are the best! You don’t want to spend hours, and you’ll look amazing nevertheless!
The ponytail is a long hairstyle that looks super impressive simply because of your hair length and it’s one of the best hairstyles to make your hair type really shine.
Straight hair, wavy hair, long locks and bouncy curls… they all look amazing in a simple ponytail. Play around to create beautiful looks!
The longer your hair is, the more likely you are to get a headache from your ponytail. So you might want to try the “double tail” version.
You basically do one ponytail with only half of your hair first and then combine it with the rest of your hair. This way the weight should be distributed a bit better.
I talk more in detail about the double tail and other ways to avoid headaches from hairdos here.
Related: 7 cute Thanksgiving hairstyles for long hair
3. The classic 3-strand-braid(s)
This is my go-to hairstyle when my curls are not fresh enough anymore to let them loose, but I still want some volume around my face. The 3-strand-braid is the easiest braiding technique there is and conveniently also super versatile.
You can use it to pimp your ponytail. Or simply have a beautiful long side braid. Or you could do two side braids for a rather playful look.
Some people even do three 3-strand-braids and then braid those again with the three strand technique!
To get the classic 3-strand-braid all you need to do is to part your hair into three even parts. Then keep putting the outer parts over the middle part. Alternately from the left and then the right. That’s it. Easy as pie.
Much easier and quicker than a fishtail braid or dutch braid, and it also looks cute!

4. The easiest updo for long hair in the world
Okay, now that we’ve covered all the usual hairstyles for long hair, let’s talk some updos.
The updo I’ll show you now is the hairstyle I use pretty much every day. Simply because it doesn’t give me a “long hair headache” and you really only need a pencil or hair stick.
No bobby pins, no tangly hair ties, nothing. Only my hair stick and me.
If you’re here for easy updos for long hair to do yourself – this is your moment!
Related: What is a hair stick & how to use it
How to do the easiest updo for long hair step by step

- First, you want to gather all your hair in your left hand as if you were gonna make a ponytail. Hold it with your thumb and index finger as shown in the picture.
- Then, use your right hand to grab the “ponytail” from below and flip your hair over the left hand. Sounds weird, but the picture shows what it should look like.
- Take your hair all the way around so that it is wrapped around your left hand.
- Keep wrapping it around the base of the “ponytail”, until you have no hair left.
- Now, take your hand out of the hair loop and pull the loop over the “knot” in the middle.
- Take a hair stick and gently push it through the middle, over the loop. You can take up hair from the scalp. But I usually don’t, simply to avoid any tugging on my hair roots. (Yes, I am sensitive like that.)
This updo is really quick!
Now, this explanation makes it sound like such an ordeal. It’s really not. Even when I don’t rush doing it, it only takes me about 15 seconds. Check out the video below to see how quick and easy it is!
If you use a pretty hair stick, this updo is perfect for work. Or any other time when you want to look put together without spending too much time on it.
This hairstyle for long hair is quick to do, doesn’t fall apart easily and distributes the weight of the hair nicely. Pros even match their hair stick color to their outfits. I am not at that level yet, but a girl can dream.
Anyway, if you’re looking for super easy ways to look put together: this one is it! No matter if you want to go for a low bun or a top knot, this technique works.
5. A long hair updo without any hair ties, clips, and pins
This hairstyle is perfect for when you really quickly need your hair out of the way but don’t have any little helpers handy. It doesn’t look quite as sophisticated as the previous bun, but it’s helped me so many times when I simply didn’t have a hair stick or hair tie on hand.
(And, honestly, who doesn’t love a quick, messy bun?)
It does come with a prerequisite though: You need to have really long hair. Shoulder-length doesn’t cut it.
The reason behind this is that for this bun to work, you need to use your own hair as a hair tie. But let’s just look at how it works and you’ll see.
Honestly, this probably is the most used one out of my easy updos for long hair!
How to make the magic updo without tools
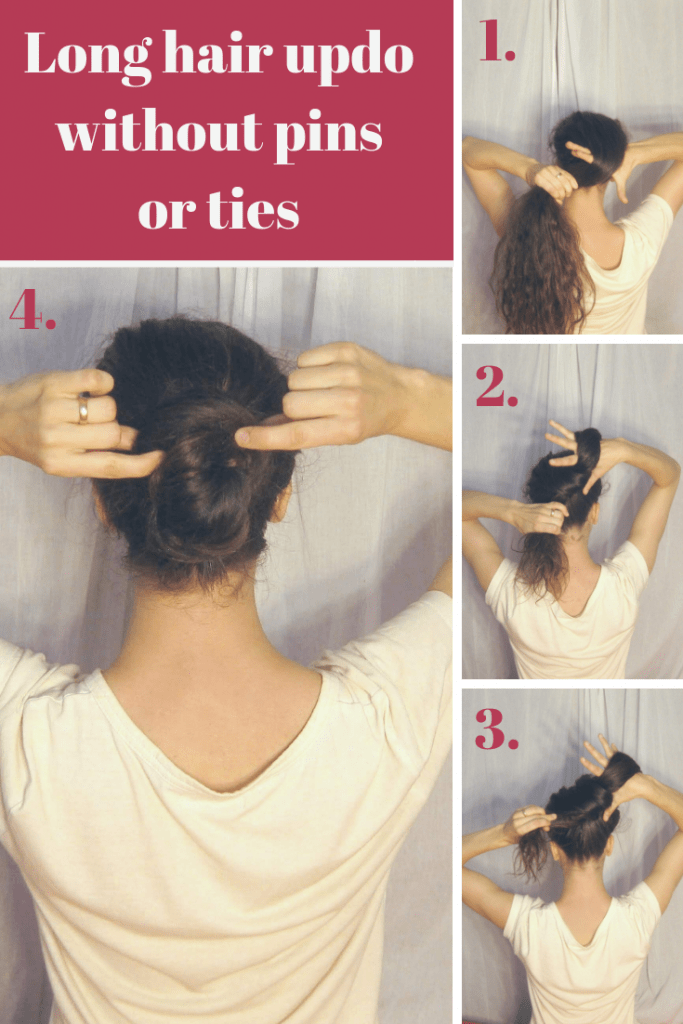
Grab your hair with the left hand as if you were making a ponytail.
- Push your right hand with the back of the hand against the base of the ponytail (from below). Let the hair fall over the palm of that hand. Touch the tips of thumb and fingers together to hold the hair.
- Now pull it towards the right and up. Your palm should end up facing forward, your hand is still holding the hair.
- Now wrap the tips of your hair around the base in the clockwise direction.
- And then you can finally put the leftover hair loop over the bun in the middle. Done!
Good to know
You might have to experiment a little bit with the size of the loop. It should be small enough to hold everything in place, but not too tight either.
But once you figured that out, this bun is even quicker than the one before. It takes me about 10 seconds to do!
And, you can easily do many different hairstyles with it! Check out 5 examples for hairstyles with the “no-tool”-bun here!
There is one downside to this long hair hairstyle: It twists the hair a little, so if you are sensitive to headaches, you might get one.
I sometimes do after wearing this bun for a while. So keep in mind that it’s really more of a temporary solution.
Related: 7 fashionable Christmas hair clips for adults to get this year
5. Another classic: The twisted updo
This updo is a rather classic bun. But even though it looks very put together, you can easily make it with only one invisibobble. (Or another hair tie, but I really like those spiral hair ties. They tangle much less and they come in all kinds of colors, without any metal pieces. You can get them here*.)
As the name says, this updo uses twisting of the hair, so again, be aware of headaches!
You’ll notice it looks quite similar to a “sock bun”. But having long hair, you don’t need a hair donut. Just follow the easy steps below and you have a beautiful hairstyle!
Related: The “long hair headache”: How to deal with it quickly
How to do the twisted updo
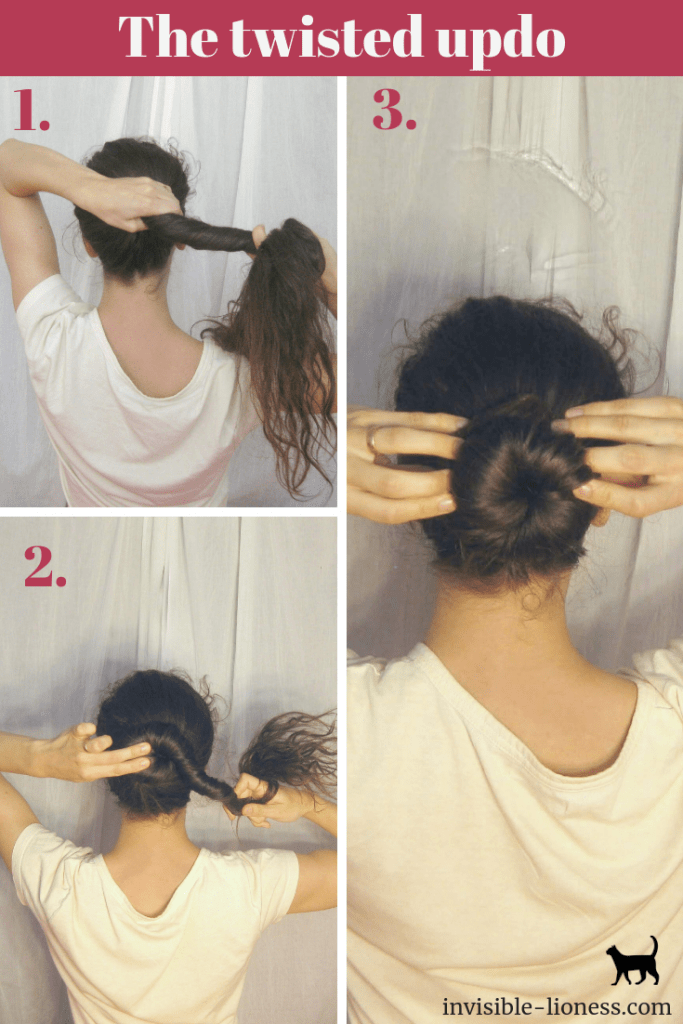
- To start, gather your hair in a ponytail at the height where you want your bun to be later. Then start twisting the hair in one direction, starting close to the scalp.
- At some point, the twisted hair will naturally bend and form coils. Let it. And lay those coils around the base of the ponytail in a clockwise way.
- Simply keep doing this until there is no more hair left to twist. Wrap an invisibobble around the base and you are done!
6. A more elegant hairstyle for long hair: the twisted musical bun
Once you’ve mastered the twisted updo, this bun will come super easy to you as well. It looks a little more elegant to me, but also playful because the finished version looks like a treble clef. (I’ve been playing the piano since I was 5 years old. I’m always ready for a treble clef!)
Ideally, you have a thin hair stick for this updo. But a pencil will work just as well. And you need a certain hair length for this as well. The thicker your hair, the longer it needs to be for this.
So if you have really thick hair, prepare for some waiting time.
How to do the treble clef bun
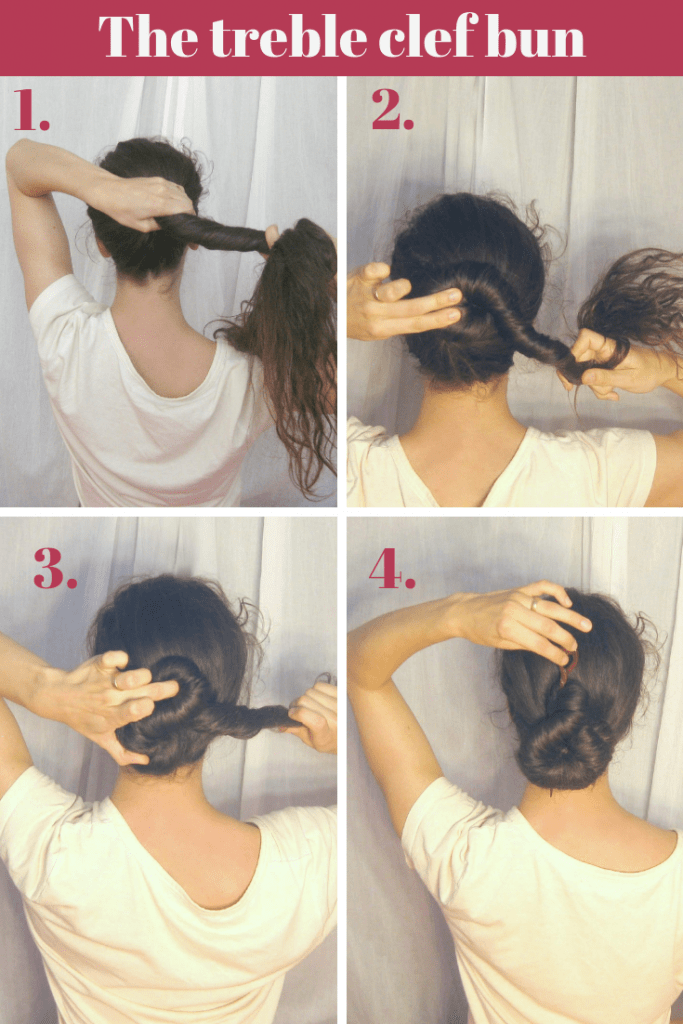
- Gather your hair like for a ponytail, but rather on the lower half of your head. Start twisting your hair just as for the twisted bun above.
- Also for the first coil, let your hair go clockwise around the base again.
- But when the second coil forms, you want to flap it upward in such a way that it forms the shape of an 8 together with the lower coil.
- Wrap the rest of the hair tightly around the lower coil. Then you can take your pencil or hair stick and put it in. Start by sticking it through the middle of the upper coil and then under the bun and out through some hair of the lower coil.
Okay, I admit you might have to let someone know that this is supposed to be a treble clef. But I know and it makes me happy. And if you’re looking for some new cute hairstyles, well, you probably haven’t worn this one before. It’s a pretty unique look.
