
When I was a teenager, I was always fighting my hair structure. My hair was neither straight nor curly, but always kinda bushy and stubborn. Frizz was my constant companion.
Related: How to get rid of frizz – the ultimate guide
Most other girls around me had sleek, straight hair by nature. And I wanted that, too! Like a typical teenager, I wanted to fit in, not be called names because of my wild mane.
I thought I needed different products, more heat styling or my hair was simply “not pretty”. What I didn’t know at the time was that I was simply treating my hair completely wrong. No one around me knew about how to treat wavy or curly hair. No one even got the idea that you cannot treat every hair structure the same.
So for years I straightened my hair, tried all kinds of products that promised soft and shiny hair and was constantly dissatisfied with the result.
Until I finally stumbled upon the curly girl method. Seriously, if my story sounds anything like what you are experiencing with your hair, chances are you might have a wavy or curly hair structure, too. In that case, the curly girl method is the answer to all your questions!
(If that question was “Does the curly girl method work?” Yes. Yes, it does.)
Hopefully, by now you’re at least curious about starting curly girl method! So let’s look at all of the following:
- What is the Curly Girl Method?
- Who is the Curly Girl Method for?
- Which products can you use for the CGM?
- Curly Girl Method techniques
- Curly Girl Method tools
- Curly girl method easy steps
Disclosure: Some of the links below are so-called provision links, meaning, at no additional cost to you, I can earn a commission if you click through and make a purchase.

What is the curly girl method?
The curly girl method was popularized by fellow curly head and hairstylist Lorraine Massey. She published the book “Curly Girl: The Handbook*” in 2001.
During that time, straight hair was “the mainstream look”, and the information in the book was eye-opening to thousands of curlies around the globe.
Up until then, most people thought that a good hair product was a good hair product. Period. The understanding that different hair structures need significantly different hair care was not common knowledge.
As the name of the book suggests, the curly girl method is the complete manual to taking care of your hair. That is if your hair structure happens to be anything else but totally straight.
It details everything from the type of products to use to various styling techniques. By using those, your natural hair structure is encouraged, thereby increasing your personal wave or curl pattern, and decreasing frizz and breakage.
You can buy the book here*!
Who is the curly girl method for?
While “curly girl” sounds a little restrictive, this hair care method really is for quite a wide audience. Even if you don’t have kinky, coily hair, chances are you’ll benefit from this kind of hair care.
In fact, the people who see the biggest results are usually the ones with an “in-between” hair structure. Their hair needs some help to take on its natural shape. Treating it like straight hair will result in frizz, “bushiness” and “rough” hair.
Using the products and techniques from the curly girl method, on the other hand, gives you defined waves or curls.
Keep in mind that it cannot create curls where there are none. If your hair happens to be bone-straight, this is not going to give you a different hair structure.
Related: How you can adapt the Curly Girl Method for straight hair
Related: Your ultimate guide to the 4 hair types
The different hair structures
After all this talk about waves, curls, and different hair structures, you are probably wondering how you can find out your hair structure, and if the curly girl method is really for you.
So let’s have a look at the classification of different hair types!
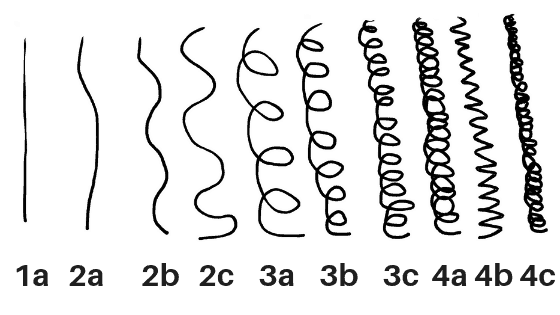
Look at single hairs from your head after washing and drying them without any styling tools or products. Most of them will resemble one of the categories above.
If you fall into anything other than 1a, you might want to give the curly girl method a try!
That being said, most people have a mixture of structures. And how you take care of your hair and the styling methods you use can also significantly change what your hair looks like. So stay curious! (You can find a whole guide on the major hair types here.)
Which products can you use for the curly girl method?
A foundational aspect of the curly girl method is the type of products you use. Up until the publication of the book, it was considered normal to wash your hair daily with shampoo.
Related: The best curly girl approved products
Lorraine Massey, on the other hand, advocates for going shampoo free. Have you ever heard the term “no-poo”? This is where it’s coming from!
Her reasoning is that shampoos dry out your hair too much. (Which is true for all hair types, by the way.) As curly and wavy hair types have drier hair by nature, it’s even more important for them to not use too many drying products.
Instead of washing your hair with shampoo, curlies are encouraged to use conditioner. Those also contain cleaning chemicals, but instead of drying out your hair, they help moisturize it.
Sulfate-free
All products a curly girl uses, from conditioners to gels and leave-ins should be sulfate-free. Sulfates strip all the beneficial oils from your scalp, leaving your hair dry and without protection.
Silicone-free
Silicones make your hair seem softer and shinier.
At first, this is a very nice side-effect. But they also build up on your hair, blocking hair care products from reaching the hair shaft. And at a certain point, the buildup has a negative effect on the looks of your locks, too. They start looking dull and don’t feel nice anymore either.
For all these reasons, Lorraine Massey recommends not using silicone-containing hair products.
No petroleum
Petroleum completely seals your hair in. Which is great if your hair is perfectly moisturized. But if it’s not, and let’s be honest, it rarely is, it blocks any care products from reaching your hair.
So petroleum-free hair care products it is!
Alcohol
All the products that stay in your hair after washing, like gels and leave-in conditioner should not contain alcohol. The reason for this is that alcohol has a very drying effect on your hair, while your gels and leave-ins are supposed to achieve the opposite effect.
Related: The best curly girl approved products
Related: The best Curly girl gifts for every occasion
What do you need for the curly girl method?
The curly girl method follows a few steps to go from wild frizz to beautifully defined curls. We’ll go into the exact order of things below, but first, you need to know a couple of things.
First, I’ll give you the rundown on the two most important techniques to use. And then, I’ll give you a list of things or tools you’ll need to successfully apply all of these methods.
Which techniques does the curly girl method use?
So let’s start learning the curly girl techniques you can use for prettified curls!
Squish to condish curly hair
The first method you need to know is “squish to condish”. You will use this technique while washing your hair with conditioner.
But instead of simply putting the conditioner on your hair and then quickly rinsing it out, you will take some time to really work the product into your cuticles. This produces a squishing sound, giving the method its name.
The idea behind this is that you really want to work the moisture into your hair. Curly hair is notorious for its difficulty to retain moisture. By really squishing the conditioner into the hair, you make sure it doesn’t simply sit “on top” of it.
Plopping
Plopping is another famous technique from the Curly girl handbook. It refers to the way you’ll dry your hair after washing it.
Instead of headbanging, blow drying or simply letting it hang, curlies put their hair into a microfiber towel or t-shirt. The special thing about it is the angle in which you do this.
Don’t simply wrap a towel around your head. Place the fabric on a flat surface at about hip level. Then you bend forward and gather your hair in the middle of the towel.
Slowly bring your head closer to the surface while letting your hair literally curl up in the process. Once your head touches down, you wrap the rest of the fabric so that it doesn’t slip down.
And now you can let your hair dry like this. Many curlies prefer to only plop for 15-20 minutes to allow their curls to get the best shape and then blow- or air dry.
Related: How long to plop wavy hair & what else to watch out for
Pineappling
The last of the techniques you’ll need to know is pineappling. It refers to a specific way to wear your hair during the night to preserve as much of the curl definition as possible.
Related: Easy pineappling – How to pineapple curly hair for bed
Tossing and turning on your hair can turn it from beautiful coil to frizzy mane. And washing it every day is not only time-consuming but also bad for your hair and scalp.
So to remedy this problem, curly girls collect their hair directly on top of their head with a soft scrunchie. The resulting look strongly resembles a pineapple – hence the name.

If pineappling doesn’t work for you – no problem: here are some other ways to sleep with curls!
Which tools do you need for the curly girl method?
Depending on how long your hair is, the pineappling method might not work for you anymore. In that case, it’s time to look at other ways to sleep with curls.
To successfully use the Curly girl method, you’ll also need to have a few tools handy:
Conditioner
First of all, you’ll need a good conditioner. Depending on your curl type and your hair porosity, you might even want to get two different ones:
- a cleansing conditioner for the so-called CO-wash
- and a moisturizing conditioner for deep conditioning and as a leave-in
Related: What is hair porosity and why should you care?
I recommend starting with a single conditioner your hair really likes. If then you notice that your hair still wants more moisture, add the second conditioner and go from there.
Make sure your conditioner is sulfate- and silicone-free! When in doubt, check the ingredients list with this handy tool!
Or simply pick a conditioner from this list of 10 curly girl approved conditioners!
What are the steps of the curly girl method?
Alright. Now you know all the basics. Which means, it’s time to give you the step by step explanation of how to follow the curly girl method.
No heat. Ever.
First, you want to throw out all your heat stylers. Heat is damaging to any hair type, but to curly structures, it’s devastating.
Related: How to dry hair without heat
No brushes
Also get rid of all your brushes. Curly girls only use wide-toothed combs or simply their fingers to detangle their hair.
The reason for this is that brushing destroys the natural “clumping” of the curls, leaving you with that dreaded bushy look.
The curly girl method even discourages combing in between washes. The only time to use the wide-toothed comb is when your hair is wet and soaked with conditioner.
Which tools do you need for the curly girl method?
Depending on how long your hair is, the pineappling method might not work for you anymore. In that case, it’s time to look at other ways to sleep with curls.
To successfully use the Curly girl method, you’ll also need to have a few tools handy:
Conditioner
First of all, you’ll need a good conditioner. Depending on your curl type and your hair porosity, you might even want to get two different ones:
- a cleansing conditioner for the so-called CO-wash
- and a moisturizing conditioner for deep conditioning and as a leave-in
Related: What is hair porosity and why should you care?
I recommend starting with a single conditioner your hair really likes. If then you notice that your hair still wants more moisture, add the second conditioner and go from there.
Make sure your conditioner is sulfate- and silicone-free! When in doubt, check the ingredients list with this handy tool!
Or simply pick a conditioner from this list of 10 curly girl approved conditioners!
Curly girl method: hair gel
To support and define your structure after washing, you can use gel. I personally love using my own homemade hair gel, as I can be sure it fits the curly girl approved ingredients. I create it in batches, then freeze it, and use it whenever I need it. But you can also find a list of curly girl approved gels here.
In any case, gels for the curly girl method should be free of sulfates, silicones, alcohols, petroleum, mineral oil or anything that derives from mineral oil.
Curly girl method: oil
For refreshing your curls in between washes and keeping them shiny and supple you’ll need a good hair oil. If you need help picking the right hair oil for your hair type, read this! Or go directly to my list of 7 curly girl approved hair oils for shiny locks!
Microfiber towel or T-Shirt

For plopping your hair you’ll need a microfiber towel or simply an old T-shirt. The reason why you don’t want to use your old terry cloth towel is that those tend to leave your hair looking brittle and frizzy.
Microfiber or cotton also soak water up well but are much curl friendlier. This one* has good reviews!
Clips
Clips are optional. They can be helpful if your curls are quite heavy and tend to lose volume on top of your head. In that case, you can clip the roots up a little to let them dry in a more “upright” position. You’d simply get some hair clips and use a clipping technique like in the video below.
What are the steps of the curly girl method?
Alright. Now you know all the basics. Which means, it’s time to give you the step by step explanation of how to follow the curly girl method.
No heat. Ever.
First, you want to throw out all your heat stylers. Heat is damaging to any hair type, but to curly structures, it’s devastating.
Related: How to dry hair without heat
No brushes
Also get rid of all your brushes. Curly girls only use wide-toothed combs or simply their fingers to detangle their hair.
The reason for this is that brushing destroys the natural “clumping” of the curls, leaving you with that dreaded bushy look.
The curly girl method even discourages combing in between washes. The only time to use the wide-toothed comb is when your hair is wet and soaked with conditioner.
Related: 8 reasons for using a wooden hairbrush or comb
The hair washing process in the curly girl method
First, before you start going full in on the curly girl method, wash your hair with shampoo for the last time. In this case, you want to use a clarifying shampoo to make sure all the leftovers from silicones are gone.
- Conditioner wash
The next time you wash your hair, only use conditioner. Wet your hair, as usual, then apply conditioner on your scalp. Make sure to give your scalp a good massage with your fingertips to loosen talc, dandruff, and product leftovers.
Also, take care to thoroughly rinse your scalp afterward. Leaving conditioner on the skin can be irritating.
- conditioner-supported untangling
Now apply conditioner generously all over your hair. (Leave out the skin of the scalp this time.) Now is the perfect time for “squish-to-condish”.
Work the conditioner into your hair, squishing all the product and moisture in. If your hair starts drying up, add a little more water and a little more conditioner and squish it in again.
Once your curls are all plump and slippery, you can carefully finger comb to detangle them. Or use a really wide-toothed comb like this one*.
- Rinsing
When you rinse, use luke-warm to cold water. (The colder the better, but I fully understand if ice-cold seems like a little much!)
To reduce frizz, I personally like to use a water bottle, because it allows me to control the water pressure. Let water run over your hair section by section.
Related: How to get rid of frizz – the ultimate guide
If your hair structure is very kinky, you might want to not wash everything out completely, but leave some conditioner in your hair. Again, this only applies to the ends. Definitely rinse off every bit of conditioner from your scalp!
